This is a guest post by Max Therry.
What better way to capture the essence of your travels than through photographing the nature and surroundings local to the place you are visiting?
If you are new to nature photography, there are a few things you should think about before you even get your camera out. This short guide will help you to get the best out of your nature photography, and you’ll soon be taking photos you can be proud of.
Do Your Homework Before Leaving
Read up on the area you want to photograph. If you want to capture images of animals that live where you’re going, find out when they are most active, and also the type of habitat they live in. Pack your gear according to the weather and the terrain, and only take the photography gear you know you’ll actually use.
Camera Settings
Although your settings will be different according to the light and environment you’re in, here’s a few handy tips to give you some starting point:
- To capture a moving object, you need a high shutter speed to freeze that movement without motion blur. If you shoot in manual mode, you may need to raise your ISO in order to get that shutter speed. Generally, anything over 1/250th second will freeze motion well.
- If you aren’t used to manual mode, try shooting in your camera’s sports or movement mode, or try using shutter priority mode. Shutter priority mode allows you to choose the shutter speed you want, and the camera will try to adjust the other settings. Bear in mind that in low-light conditions this can be difficult, even with a tripod.
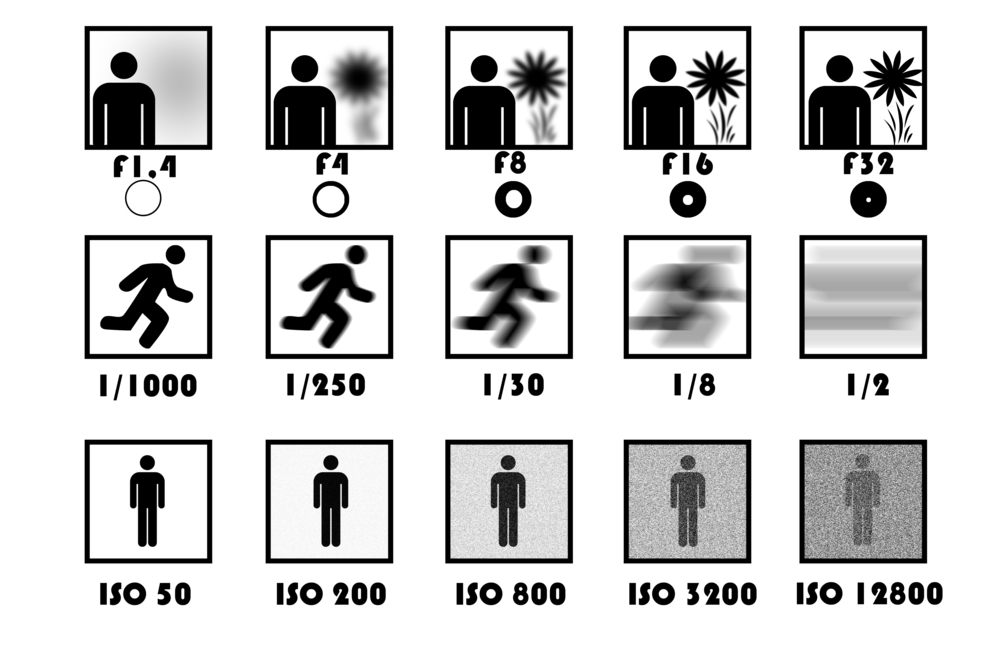
Quick cheat sheet on how different settings affect your picture: aperture, shutter speed, ISO
- You can increase your ISO settings to allow the sensor to become more sensitive to light, enabling you to have a higher shutter speed.
- Choose your aperture according to what you want from the image. If you want to capture movement crisply or have things sharp from front to back, choose an aperture of f/8 or more. If you want a close-up of a still subject, you can make it stand out more by changing your aperture to f/5.6 or less. This will help blur the background and make your subject the main area of focus
Use AF Continuous Mode (AI Servo) When Photographing Wildlife
Animals and birds are almost constantly moving, and this is where the AF Continuous or AF Servo modes come in.
They are called different names according to what camera brand you use, but they both do the same thing, which is to keep a moving object constantly in focus. Read your camera manual for more detailed information on the specific AF capabilities of your model.
Shoot in RAW format
You may be used to shooting in JPEG, but there’s a reason professional photographers shoot in RAW, and that’s to do with the image quality. JPEG’s are compressed by the camera, and this means that the camera discards some of the image information. This loss of data renders the image far less detailed and much lower in quality than a Raw file. RAW files contain every single piece of information in an image, which makes it easier to adjust in post processing, among other things.
Usually, you can switch your photo format to Raw thought the “Quality” setting menu in your camera settings. Important note: Raw files will take much more space in your storage that JPEG, so if you’re intended to shoot in Raw, packing some spare memory cards is a good idea.
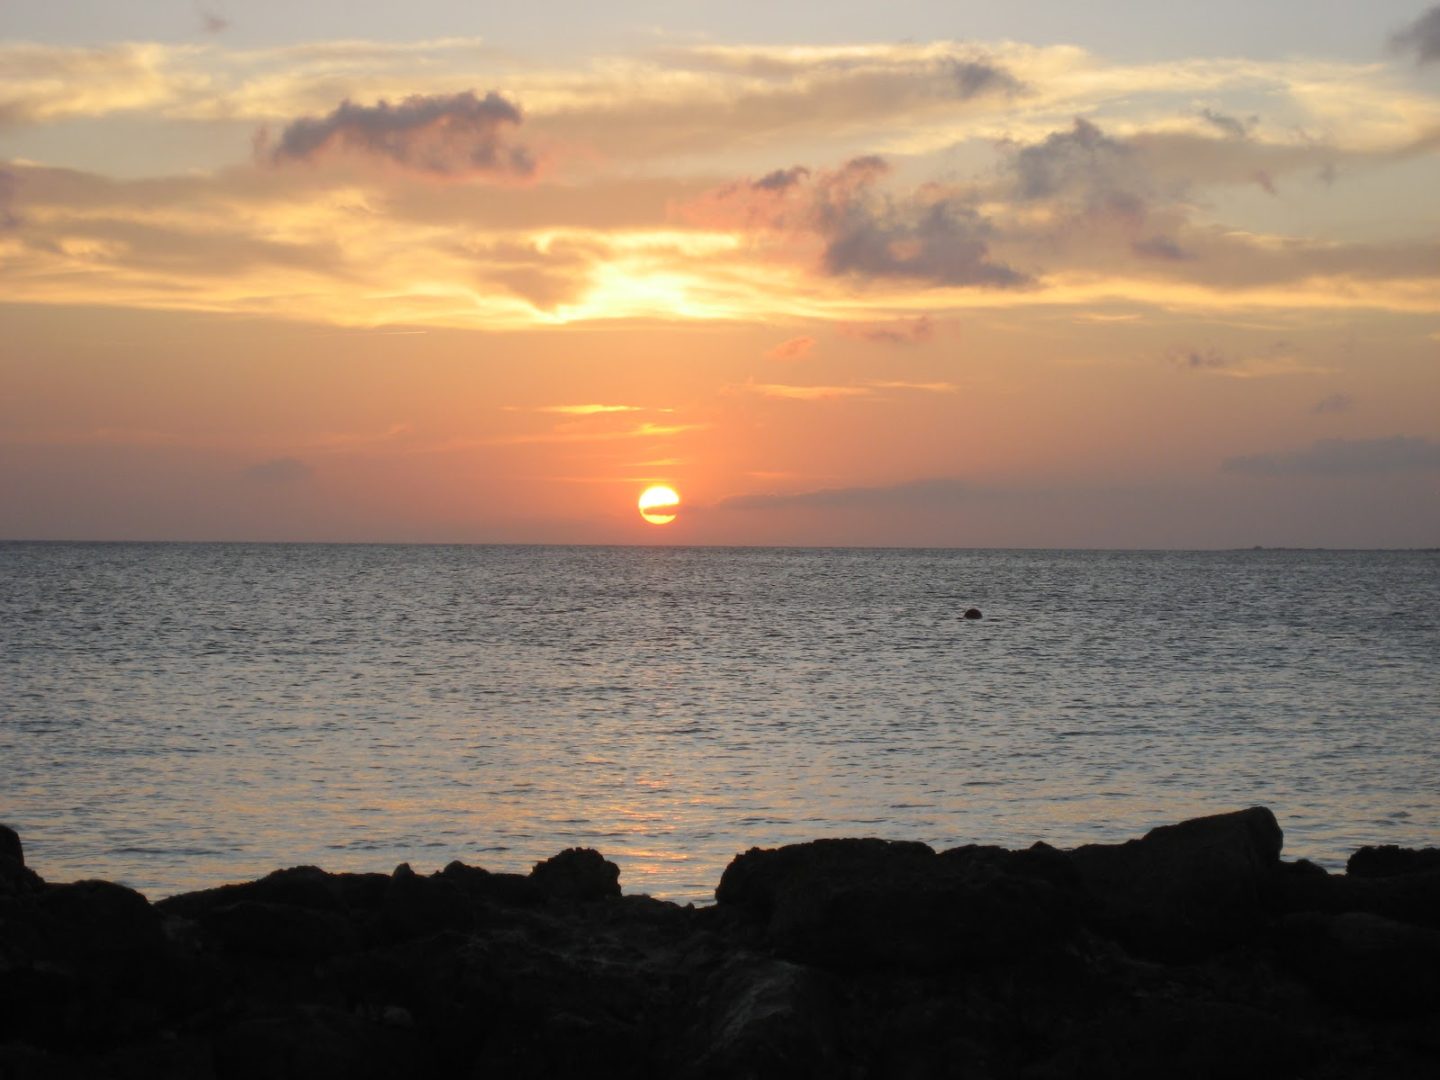 The Golden Hour on Bonaire Island
Light and Shadow
As a nature photographer, you’ll have to rely on natural light. However it is possible to control natural light with reflectors and diffusers, it’s not the case for nature photography. Shooting landscapes and nature, we can only adjust to it and change its effect by moving and of course, waiting. The direction of light changes over the day and affects your photo in different ways:
- Side light: The light will be coming from one side of the subject, and that means the opposite side will be in shadow. If you shoot in RAW you can lighten these shadows later.
- Back light: All the light is coming from the back of the subject, so the front is in deep shadow, making a silhouette. This happens when you shoot with the sun directly behind your subject. If done intentionally, silhouettes make very powerful images.
- Front light: Obviously, this light comes from the front of the subject, and is best for seeing all of the details of something from the front.
- Top light: This is the kind of light you may get in the forest, when the trees block most of the light apart from in the gaps, where sunshine may come through and make a sort of ‘spotlight’ effect.
- Diffused light: This is the kind of light you get on a cloudy day. This light is very even, and good for photography, although contrast may need increasing in post-processing.
Use a Tripod in Low Light
If you are going to be shooting in a forest or other areas where the light isn’t bright, you will need a tripod to keep your camera still while shooting longer exposures, or you will end up with blurry images. Sometimes you won’t even notice any blur on your camera screen, but opening the image on your computer usually reveals it.
Shooting Landscapes
The best times to shoot landscapes are the hour after sunrise, and the hour before sunset, when the light is soft and beautiful. To capture landscapes that are sharp from front to back, try shooting at f/11 or more for a wide depth of field.
Landscapes are perfect subjects for shooting HDR, as they often have lots of shadow and highlight areas. Take a look at the example below:
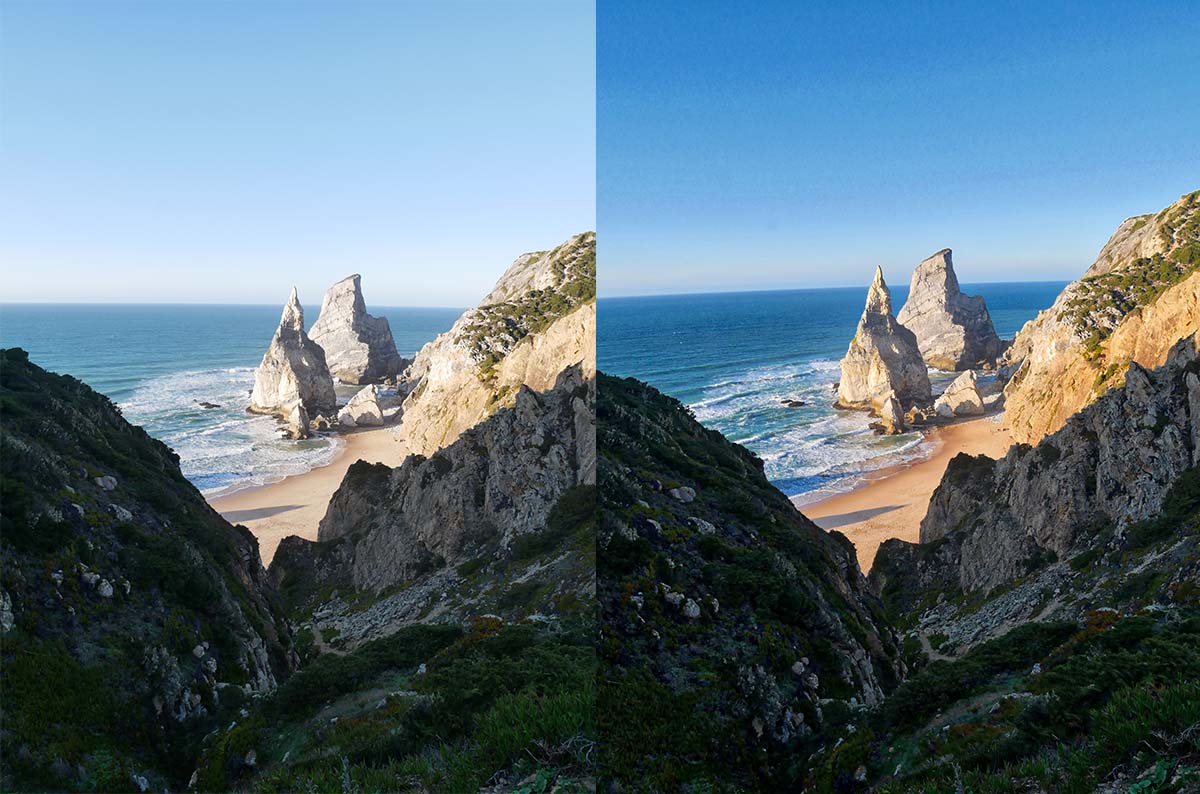 Usual image (on the left) vs HDR image (on the right)
HDR for Perfect Exposure
Although High Dynamic Range (HDR) images don’t suit fast moving animals, you can get great still shots using the bracketing technique.
This means shooting one image around one stop underexposed, one at correct exposure, and a third image at one stop overexposed. You can set your camera up to automatically bracket in three shots. This technique is best used on still subjects and landscapes, as you will be combining the shots in post processing.
To get some awesome HDR images when you get home, load your bracketed shots in to a HDR editor (Aurora HDR, Photomatix, Lightroom) or plugin like free Google’s Nik HDR Efex Pro, and they will merge different exposures for you.

Experiment With Composition
You can’t learn and improve unless you experiment, so try changing the way you compose and frame your images in camera.
- Lead the eye in: this is an effective way to create powerful composition. Leading elements can be anything, lines, curves or a progression of shapes. Leading lines that move from foreground to background are very powerful.
- Find a good foreground: A good choice of foreground will add depth to your image, and they give a point of reference. Pools of still water often provide a good foreground, with the reflections of the surrounding landscape in them.
- Emphasize your subject: Framing your subject is an effective tool for focusing interest. For instance, use the tree branches surrounding an animal or bird to provide a frame.
Final Thoughts
Nature and landscape photography can be so rewarding, and is a perfect way to create memories of your travels. Have fun, make some great images, and remember to treat the wildlife and environment with respect while you are out photographing.
I hope you liked this guest post about nature photography!
What do you like to photograph the most? Nature, buildings, people,…? nature photography, nature photography, nature photography,
Learn more about Max Therry
Max is a 28-year-old architect who would rather be a full-time photographer.
If you want to learn more about photography you should definitely check out Max his website!

For years and probably near 100,000 photos I’ve been shooting in jpeg. Storage-wise it’s been a life-saver but I’m starting to wish I kept them raw as I progress :s
Author
Same here! This year I started shooting in raw myself. But now we know better 🙂 😉
It’s not easy to take a shot of the natural landscape. I love these kinda captures so thanks for your tips. I can’t wait to use them 🙂
Great tips, we just changed to shooting RAW and it is more work but the photos are better for it! We also just discovered diffraction too which was something I never knew about, it’s important to look at the diffraction limit of each lens as f11 could too small on some cameras and ok on others.
Thanks for sharing those great tips on photography. It is very useful, especially for those who travel. Experiment with composition section was very useful.I will definitely try those camera settings mentioned next time.
Great tips! I haven’t really got my head around photography yet so this is a very useful guide!